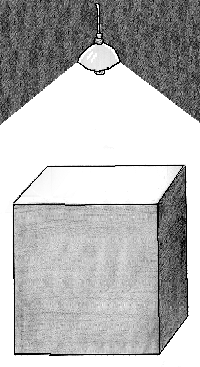
One of the best ways to make a simple line drawing of a solid or surface appear to pop out into 3-space is to shade it properly. In order to shade a drawing realistically you must first decide where the light source causing the shade is positioned. Since most of the natural light in our world comes from above, our brains are accustomed to processing shadows cast by such light sources. For this reason, as well as for simplicity, I suggest that you position the light source directly above the object.
Here is a sequence of drawings designed to show how light from above might affect various surfaces:

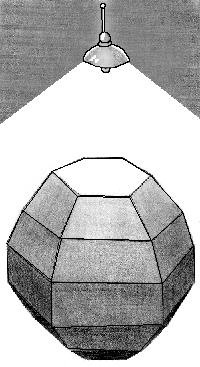
**ARTIST'S NOTE** Any three dimensional object in the real world would not necessarily be affected by light in this way since real world light almost always involves multiple indirect light sources. Also, these objects cast no shadows as any real world object would, since the mathematical objects we draw float in empty space.
While looking at these drawings you may have notices some of the following:
-Each plane is shaded only one color gray.
-Planes closer to the light source or viewer are proportionally lighter.
-Planes angled more towards the light source are proportionally lighter.
If you stick to these simple rules when drawing planar surfaces and solids, they will appear to be three dimensional.
You may by now have noticed that most of the surfaces we will be drawing are not planar, but rather are smooth and curvy. Here's one more shaded drawing to help you understand how to shade a curved surface:
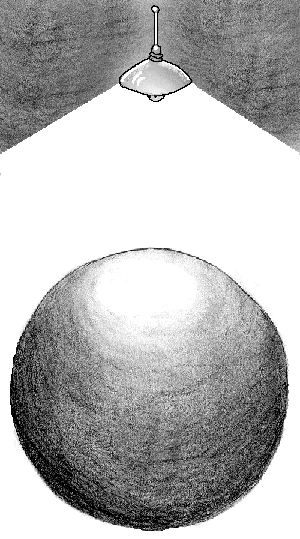
Compare this drawing to the last drawing in the previous sequence of pictures. You will notice that the only significant differences between the two drawings are the shape of their outlines and the presence or lack of inner outlined planes. If we had rounded out the planar drawing's outline and smudged away its inner lines, we would have gotten the spherical drawing.
In math we are used to thinking of smooth, curvy surfaces as having tangent planes at every point. The easiest way to shade such surfaces is to imagine what color some of these tangent planes would be given the position of the light source, and then to interpolate between these planes. In this case, interpolating = smudging. The best tools for smudging are erasers and fingers.
Extra Shading Tips
1. Use a 2B (or higher, 6B is best) pencil to shade. Don't use H pencils because they have harder lead and won't shade smoothly and darkly. I recommend a refillable mechanical pencil. Always have an eraser on hand -- it can be used to make an area white if rubbed with hard or to smoothly smudge a gray area if rubbed with lightly.
2. Before shading more complicated surfaces it can be helpful to lightly draw in some inner contour lines to make sure that you understand exactly what the surface looks like in between its outlines and slice curves. Take f(x,y) = x<^2> - y<^2> for example:

These contour lines make it easy to see how the surface curves in 3-space. They were drawn by taking approximate slice curves at very small intervals in both the fixed x and fixed y directions.
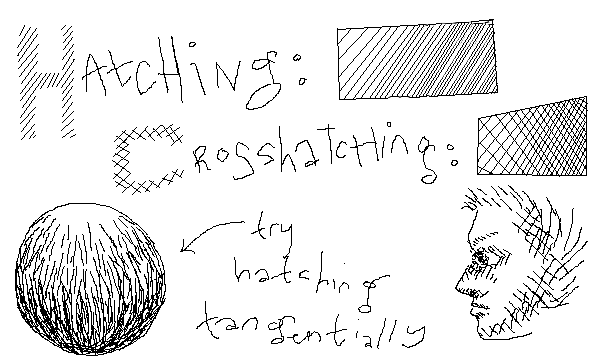
3. If you hate using pencils you may want to try shading by hatching and crosshatching. The basic idea of hatching is that an area of alternating black and white stripes appears gray to the eye. Changing the frequency of the stripes changes the darkness of the gray color; more stripes per area means darker gray. Crosshatching is hatching in two directions over the same area. Crosshatching produces darker grays than hatching since there are more black stripes per area. Here are some hatching and crosshatching examples: